Getting Started With Box2D
This series of tutorials will explain how to access and use various key features of the Box2D physics engine from within MOAI. It is assumed that you have been through the Moai Basics articles and at least some of the Platform Tutorials, and have at least a basic grasp of things like viewports, props, threads, etc.
Creating a Testbed
In order to learn about Box2D you'll want to have an environment where you can play around with some of the features, so create a folder somewhere on your machine and place a blank main.lua file there, as well as a copy of cathead.png and the appropriate batch file for your operating system. If you're unsure about any of this, just copy the contents of one of the Moai samples folders (i.e. anim-basic) into a new folder, blank out the main.lua file and alter the .bat or .sh file so that it points correctly to your Moai.exe.
Here are the first lines of your new main.lua, they should look pretty familiar by now:
----------------------------------------------------------------
--constants
----------------------------------------------------------------
STAGE_WIDTH = 500
STAGE_HEIGHT = 500

----------------------------------------------------------------
--window, viewport, layer
----------------------------------------------------------------
MOAISim.openWindow( "Box2D Testbed", STAGE_WIDTH, STAGE_HEIGHT )

viewport = MOAIViewport.new()
viewport:setSize( STAGE_WIDTH, STAGE_HEIGHT )
viewport:setScale( STAGE_WIDTH, STAGE_HEIGHT )

layer = MOAILayer2D.new()
layer:setViewport( viewport )
MOAISim.pushRenderPass( layer )
You'll need some space to move objects around, so this window is a bit larger than the standard 320x480 size most of the samples use. Feel free to adjust these constants to whatever size makes sense for your development environment - of course if you do so you'll also need to adjust the positions of objects so they are visible onscreen.
Optional : The Info Box
As you experiment with Box2D, you may want to be able to view information like object positions, rotations, and velocities in real time. One way to do this is with the code below, which will place a textbox in the upper left quadrant of your Moai window. Later on, you can call setString from within a loop or thread to keep the box populated with current data. Of course, if you have your own preferred solution for viewing debug info you are free to ignore this. Some parts of this tutorial series may prompt you to populate the info box, but these instructions won't affect how the actual physics code works and you can safely ignore them if desired.
Here's the code for setting up the info box. Don't forget to grab the appropriate .ttf and put it in your project folder (the "textBox-alignment" sample folder in the SDK contains a copy of "arial-rounded.TTF" you can grab if you need a font):
----------------------------------------------------------------
--info box
----------------------------------------------------------------
charcodes = "ABCDEFGHIJKLMNOPQRSTUVWXYZabcdefghijklmnopqrstuvwxyz"
            .."0123456789 .,:;!?()&/-"

font = MOAIFont.new()
font:loadFromTTF( "arial-rounded.TTF", charcodes, 7.5, 163 )

infoBox = MOAITextBox.new()
infoBox:setFont( font )
infoBox:setTextSize( font:getScale())
infoBox:setString( "Ready" )
infoBox:setRect(-STAGE_WIDTH/2, 0, 0, STAGE_HEIGHT/2)
infoBox:setYFlip( true )
layer:insertProp( infoBox )
The Box2D World
To create a working Box2D physics simulation in your Moai project, the first thing you'll need is a "world". A Box2D world is the "boss" entity of the physics simulation. It controls things like creating and removing bodies and joints, as well as gravity and the size and speed of the simulation. Here's the world setup code:
----------------------------------------------------------------
--box2d world
----------------------------------------------------------------
world = MOAIBox2DWorld.new ()
world:setGravity( 0, -10 )
world:setUnitsToMeters( 1/30 )
world:start()
layer:setBox2DWorld( world )
Units to Meters is an important variable that controls the size of the simulation. Box2D works best on simulated objects between 0.1 and 10 meters in size, or as the manual puts it, "between soup cans and buses". You'll want to adjust the UnitsToMeters setting until the average pixel size of the objects you are using translates roughly into simulated physics objects of an appropriate size. Not scaling your simulation properly will result in Box2D trying to apply billiard-ball style physics to objects it thinks are the size of ocean liners and office buildings, which will not produce the behavior you want.
This example world's scale will be set at 30 units to one meter (the name setUnitsToMeters is a little misleading here; with a value of 1/30 it would make more sense as setMetersToUnits). When you create, for example, a circle with a radius of 20 pixels, what Box2D will see is a circle that is (diameter 40 pixels divided by 30 pixels per meter) one and one third meters across, which is a size that Box2D can handle comfortably. Keep in mind also that the only reason we can use "units" and "pixels" interchangeably is that our viewport scale is set to exactly the viewport's size in pixels; if we were scaling the view we would have to account for that when determining how many pixels are in a meter.
Once you have your scale worked out, you can set the gravity value. Gravity is expressed as the x and y directional movement to be applied "per-second per-second" to each object in the scene that is subject to gravity (more on this under bodies, below). To make this example world fairly realistic, a value of around 10 makes sense (actual gravity is around 9.8 m/s2), and since your bodies are scaled to represent normal-sized objects, they should fall in a reasonably convincing manner.
Finally, world:start puts the simulation in motion, and setBox2DWorld applies the physics simulation to a rendering layer, so the physics objects will be drawn properly.
The Three Types Of Bodies
Bodies in Box2D come in three flavors: Static, Dynamic and Kinematic. Here's the code to add one of each to your world:
----------------------------------------------------------------
--box2d bodies
----------------------------------------------------------------
--a static body
staticBody = world:addBody( MOAIBox2DBody.STATIC )
staticBody:setTransform( 0, -100 )
--a dynamic body
dynamicBody = world:addBody( MOAIBox2DBody.DYNAMIC )
dynamicBody:setTransform( -50, 0 )
--a kinematic body
kinematicBody = world:addBody ( MOAIBox2DBody.KINEMATIC )
kinematicBody:setTransform( 50, 0 )
If you add this code and run it, you should see ... nothing. Why's that? Well, a Box2D body is an intangible object. It cannot be drawn or interacted with. What you actually see and manipulate are Fixtures, which are attached to bodies and discussed below. So what are bodies? They are containers for information about the physics object, like position (that's what setTransform is doing in the code above), angle, the speed at which its moving (in a line and/or rotating) and subtler things like inertia. We'll get to manipulating these properties soon, but for now it's enough that you understand that you don't interact directly with bodies, and move on to putting something onscreen you can interact with.
The three types of bodies will make more sense once you see them in action, but for now here's an overview: Static bodies do not move on their own. They can be placed using setTransform, but they don't respond to gravity or collisions. Kinematic bodies are also impervious to being affected by other bodies, but they can move under their own power. With dynamic bodies, anything goes, and they will be affected by all forces and other objects they come into contact with, unless you specifically set them up to ignore some forces (doing so is discussed below).
Here's a simple way to picture the three types: Suppose you are making a platformer game in Box2D. The ground beneath the player will probably be a Static body. The player and any monsters will be represented by dynamic bodies: they can interact and affect one another. A kinematic body would be used to create a floating platform that moves back and forth. It moves under its own power, but it is not affected by gravity or other forces, and there is nothing the player can do to affect its movement.
Fixtures
Time to get some fixtures on-screen. Enter the following code and run the program:
----------------------------------------------------------------
--box2d polys and fixtures
----------------------------------------------------------------
rectFixture = staticBody:addRect( -200, -15, 200, 15 )
circleFixture = dynamicBody:addCircle( 0, 0, 20 )
hexPoly = {
 -10, 20,
 -20, 0,
 -10, -20,
 10, -20,
 20, 0,
 10, 20,
}
hexFixture = kinematicBody:addPolygon( hexPoly )
If everything is in order, you should see a circle, a rectangle, and a hexagon. The circle, affixed to a dynamic body, should immediately drop until it encounters the rectangle, which is attached to the static body. The hexagon (kinematic body) should not move.
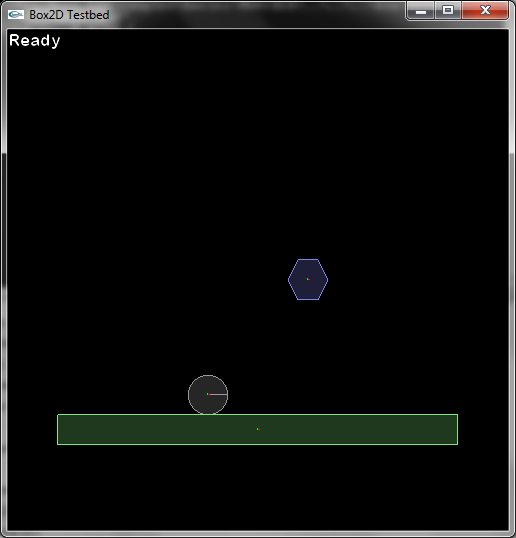
There are a number of things to note in this example. First, Moai provides you with the addRect and addCircle functions for creating simple shapes. For more complex shapes, you'll need to create a polygon, as is done in the code above, by building a table containing the x and y values of each vertex of the polygon. Box2D only supports convex polygons, meaning that if you were walking around the outside of the polygon, you would always be turning in the same direction. Concave polygons are possible with a little extra code, and will be discussed later.
The parameters of addCircle and addRect control not only the size of the fixture, but the offset from the center of the body. Since multiple fixtures are possible on any body, you can use these offsets to create more complex shapes. For example, replace the previous code with the following code, and you'll get an idea about how you can build more complex shapes using multiple fixtures:
----------------------------------------------------------------
--box2d polys and fixtures
----------------------------------------------------------------
rectFixture = staticBody:addRect( -200, -15, 200, 15 )
circleFixture = dynamicBody:addCircle( 0, 20, 20 )
hexPoly = {
  -10, 20,
  -20, 0,
  -10, -20,
  10, -20,
  20, 0,
  10, 20,
}
hexFixture = dynamicBody:addPolygon( hexPoly )

Another thing to note is that when your dynamic object hits the "floor" of a static object, it will dim out. The brighter color indicates that the body attached to that fixture is "active". Box2D is getting information about it every time the simulation moves forward by one "step". If the object is no longer moving on its own or being affected by any forces, Box2D will temporarily put that object in a "sleeping" state, in order to conserve processing power by only paying attention to objects currently in action. When something happens to that object, the simulation wakes it up and starts tracking it again. If for some reason you need an object to be permanently awake, you can make use of the setActive function to do this.
Keep in mind that what you are seeing here is the result of Box2D's built in "debug draw" functionality. In your actual game, you will have props that are attached to your physics objects with setParent, and these luminous squares and circles will be invisible. Controlling the visibility of your physics simulation will be discussed in a future tutorial.
That ends this first article in the series, but there is lots more to learn before you are ready to create a game using Moai and Box2D. Take a moment or two to alter some of the variables in your code and see what kinds of things you can make happen. When you're ready, continue on to the next tutorial. Below is the complete code from this first tutorial, it will be referenced as a starting point in future installments:
----------------------------------------------------------------
--constants
----------------------------------------------------------------
STAGE_WIDTH = 500
STAGE_HEIGHT = 500

----------------------------------------------------------------
--window, viewport, layer
----------------------------------------------------------------

--[[ DEBUG LINES
MOAIDebugLines.setStyle ( MOAIDebugLines.PROP_MODEL_BOUNDS, 2, 1, 1, 1 )
MOAIDebugLines.setStyle ( MOAIDebugLines.PROP_WORLD_BOUNDS, 2, 0.75, 0.75, 0.75 )
MOAIDebugLines.setStyle ( MOAIDebugLines.TEXT_BOX, 2, 1, 1, 1 )
 --]]

MOAISim.openWindow( "Box2D Testbed", STAGE_WIDTH, STAGE_HEIGHT )

viewport = MOAIViewport.new()
viewport:setSize( STAGE_WIDTH, STAGE_HEIGHT )
viewport:setScale( STAGE_WIDTH, STAGE_HEIGHT )

layer = MOAILayer2D.new()
layer:setViewport( viewport )
MOAISim.pushRenderPass( layer )

----------------------------------------------------------------
--info box
----------------------------------------------------------------
charcodes = "ABCDEFGHIJKLMNOPQRSTUVWXYZabcdefghijklmnopqrstuvwxyz"
            .. "0123456789 .,:;!?()&/-"

font = MOAIFont.new()
font:loadFromTTF( "arial-rounded.TTF", charcodes, 7.5, 163 )

infoBox = MOAITextBox.new()
infoBox:setFont( font )
infoBox:setTextSize( font:getScale ())
infoBox:setString( "Ready" )
infoBox:setRect(-STAGE_WIDTH/2, 0, 0, STAGE_HEIGHT/2)
infoBox:setYFlip( true )
layer:insertProp( infoBox )

----------------------------------------------------------------
--box2d world
----------------------------------------------------------------
world = MOAIBox2DWorld.new()
world:setGravity( 0, -10 )
world:setUnitsToMeters( .10 )
world:start()
layer:setBox2DWorld( world )

----------------------------------------------------------------
--box2d bodies
----------------------------------------------------------------
--a static body
staticBody = world:addBody( MOAIBox2DBody.STATIC )
staticBody:setTransform( 0, -150 )
--a dynamic body
dynamicBody = world:addBody( MOAIBox2DBody.DYNAMIC )
dynamicBody:setTransform( -50, 0 )
--a kinematic body
kinematicBody = world:addBody( MOAIBox2DBody.KINEMATIC )
kinematicBody:setTransform( 50, 0 )

----------------------------------------------------------------
--box2d polys and fixtures
----------------------------------------------------------------
rectFixture = staticBody:addRect( -200, -15, 200, 15 )
circleFixture = dynamicBody:addCircle( 0, 0, 20 )
hexPoly = {
  -10, 20,
  -20, 0,
  -10, -20,
  10, -20,
  20, 0,
  10, 20,
}
hexFixture = kinematicBody:addPolygon( hexPoly )